
В отличие от iOS платформа «Андроид» является более открытой и податливой для так называемого глубокого управления. Но и здесь имеются кое-какие ограничения с запретами. Рядовому пользователю система не позволит вмешиваться в свои файлы и экспериментировать с потенциально опасными настройками.
Эти ограничения тоже можно обойти, если открыть Root-доступ на «Андроид», то есть получить права суперпользователя. Подобное вмешательство в систему может негативно отразиться на платформе, особенно если речь идет об экспериментах новичка. Так что стоит несколько раз подумать, прежде чем получить Root-права и доступ к «Андроид». Последствия от неумелых действий могут быть самыми печальными. Но обо всем порядку.
Nowadays there are several apps that enable us to perform this method without needing to link our phone to a Windows desktop, and through the fully automated method, as is the situation with iRoot. Who says that it was difficult to root an Android smartphone?
This application enables us to alter the working system configurations and to deepen our smartphone to do stuff as exciting as battery storage and uninstall the bloatware present on our computer, provide backups, or speed up our computer.
Download iRoot 3.4.9 Apk and 3.5.3 Apk For Mobile
Downloading this app’s APK file, which obviously isn’t accessible on Google Play, enables us to root our Android step by step. Just press the enormous button on the screen, wait a few minutes for the instant job, restart the device when requested and see if everything has functioned properly.
But the type of app is also inconvenient, and before you root your machine, we should keep it in mind: we will loose our warranty, the operating system may become volatile or even our computer may stop functioning. Last but not least, you should understand before trying out this request that the developer’s website contains a list of all app-enabled smartphones and tablets (although the list may not be 100 percent up to date).
» » Download Root Genius APK v2.2.89 (Latest Version)
Do you own an Android smartphone or tablet? Are you looking for a quick way to root your device? If yes is your answer to both these questions, then you are on the right page. Download Root Genius APK from here, install it on your Android device and root it easily without using a computer.
Root Genius is a one-click Android rooting application that lets you root your device without the use of a PC or laptop computer.
Here you can download all versions of Root Genius for Android, including its latest version v2.2.89 totally for free.

- Root Genius App Features
- 1) One-click Root:
- 2) Simple UI:
- 3) Supports All Android Versions:
- 4) No Internet Connection Required:
- 5) No Need For A Computer:
- Download Root Genius APK (All Versions)
- Root Genius App Information
- Points To Remember
- Reader Interactions
- iRoot Android App Features:
- 1) One click Rooting Tool:
- 2) App Recommendations:
- 3) Internet Connection Required:
- 4) No Data Loss:
- Download iRoot APK (All Versions):
- iRoot Application Information:
- Points To Remember:
- Reader Interactions
- Root Android 7.0 (N) for any phone and tablet
- Steps
- Download USB DRIVER for Android
- Legal conditions
- How to root android Safely?
- What is SuperSU?
- Features
- Open Source
- Free
- Support
- What is SuperSU APK?
- What is SuperSU ZIP?
- Download SuperSU ZIP v2.82
- Why Root Android Using SuperSU ZIP?
- How to Install SuperSU Zip On Android?
- How to check if your device has root?
- Download iRoot For Mobile (iRoot. apk)
- Особенности процедуры
- IRoot Apk file Information
- Download iRoot 3. 3 Apk For Mobile (Latest Versions)
- Удаление Root-доступа
- Как получить рут-права?
- How to Root from iRoot Tutorial
- IRoot download – Rooting System Requirements
- Особенности программы
- Download iRoot Android for the smooth rooting process
- Some Important Points
- Know the Features iRoot Android App (iroot. apk)
- Последствия получения прав администратора
- Зачем нужны Root, или права суперпользователя?
- Подготовка
- About iRoot App
- Получение прав администратора с мобильного устройства
- Получение прав администратора с ПК
Root Genius App Features
1) One-click Root:
Using Root Genius for Android, you can easily root your Android smartphone or tablet. All you have to do is download Root Genius APK file from here, install it on your device and click on the “Root” button.
2) Simple UI:
3) Supports All Android Versions:
Root Genius Android application supports all versions of the Android operating system, i.e., you can install it on almost all Android smartphones and tablets.
4) No Internet Connection Required:
You don’t need to have an active internet connection while using this app to root your device. You will only need an internet connection for downloading this app to your device.
5) No Need For A Computer:
Root Genius for Android (rootgenius.apk) lets you root your Android smartphone or tablet without using a computer.
Download Root Genius APK (All Versions)
Root_Genius_v2.2.89 – Latest Version
Root Genius App Information
- Latest App Version: 2.2.89
- Package: com.shaume.rootgenius
- File Size: 13 MB
- Android Version Supported: 2.3 or higher
- App Status: Working
Points To Remember
1) Shaume officially provides the Root Genius for Android application files given here. So, all credits must go to them.
2) When you use Root Genius APK to root your device, you don’t require a computer at all. Also, please note that rooting your Android device using this app will void the warranty.
3) If you are looking for an easy way to root your Android device with a computer, then download Root Genius rooting tool for Windows and use it for rooting your smartphone or tablet.
4) If this app doesn’t work for you, try one of the alternatives rooting apps from our rooting tools page.
If you face any errors while using this tool to root your Android smartphone or tablet, drop a comment below.
Reader Interactions
» » Download iRoot APK v3.5.1 (Latest Version)
Are you using an Android smartphone or tablet? Are you searching for a way to gain root privileges on your Android device? If yes is your answer to both of these questions, then you are on the right page. Download iRoot APK (Android application) from here, install it on your smartphone or tablet and root your Android device successfully.
The iRoot APK or iRoot for Android is developed by the same team who have previously released the iRoot for PC. The app is available for free, and it is being used by a lot of people to root their Android devices.
iRoot Android application offers the simplest way to root your Android device, i.e., you can root your smartphone or tablet just by a tap on your smartphone screen using it. Here, we have provided all versions of the iRoot Android app (iRoot APK), which has been released until now.

iRoot Android App Features:
1) One click Rooting Tool:
iRoot for Android lets you root your Android device by a tap on your smartphone or tablet screen. This is by far the easiest way to root your device.
2) App Recommendations:
Once you finish rooting your Android device with iRoot, it offers app recommendations. All these recommended apps, if used, will improve the performance of your smartphone or tablet.
3) Internet Connection Required:
Unlike Kingroot or Framaroot, iRoot requires internet connection to root your Android device. So, after installing the iroot.apk file on your device, you will need to enable internet connection before using it for rooting your device.
4) No Data Loss:
If you are using iRoot android application for rooting your smartphone or tablet, you won’t have to worry about the loss of data because the rooting procedure involving iRoot.apk isn’t a data loss process.
Download iRoot APK (All Versions):
iRoot_3.5.1_180516_1015 – Latest Version
iRoot Application Information:
- Latest App Version: 3.5.1
- Package: com.mygun.shua.su
- File Size: 12.75 MB
- Android Version Supported: 2.3 or higher
- Status: Working
Points To Remember:
1) Shenzen, an experience Android developer, has built and distributed the iRoot for Android, one-click rooting tool. So, all credits must go to him.
2) Like every other rooting tool, using iRoot for rooting your android device will void its warranty. So, think well about it before rooting your device.
3) Similar to the iRoot Windows application, the iRoot for Android has been created by the same developer Shenzhen. So, all credits go to him.
4) If you are looking for a way to root your Android device using Windows computer, then download iRoot for PC.
5) If this app doesn’t work for you, try one of the alternative apps from our rooting tools page.
Reader Interactions
—>
Root Android 7.0 (N) for any phone and tablet
—>
<!—
bookmark
—>
<!—
share
—>
If you want to root your smartphone / tablet with Android 7.0 (known as N or Nougat) or unlock the bootloader of your device here you can find the steps to make it. Rooting your device, you can download applications that require root access (such as those that reduce battery consumption), uninstall all the unwanted applications (bootware) on your smartphone, and more.
1 – To root Android 7.0 you must remember before you start to do some preliminary steps, these are:
Keep the battery charged, at least 70% (but it is always advisable to charge up to 100% before installation for any problems that may arise).
Among a few lines you will see how to have root permissions on your smartphone or tablet running the latest Android 7.0 Nougat version.
Steps
- 3 – Go to Settings in your phone.
- 4 – Click About phone.
- 5 – Make click for 7 times over “Build Number”. It will be visible “Developer options” menu in Settings.
- 6 – Press back button and click “Developer options” in Settings.
- 7- Connect your phone with PC using an USB data cable.
- 7 – Into “Developer options” click over “Enable USB debugging” option.
- 9 – In your PC browser go to https://autoroot.chainfire.eu and click “Fastboot flashable devices” link.
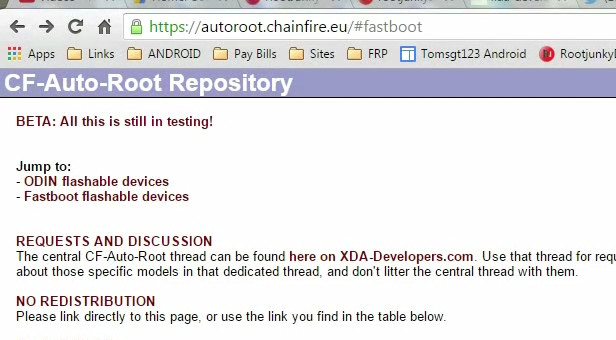
- 10 – Search your device in the list and click “download” to get the required files to root it or to unlock the bootloader.
- 11 – Unzip the downloaded file in your PC.
- 12 – Disconnect USB cable from your phone.
- 13 – Go into fastboot mode in your phone. To make it, turn off the device completely and then press and hold the Power button and the Volume Down button for a few seconds and fastboot screen will appear.
- Connect your phone with PC using an USB data cable.
Download USB DRIVER for Android
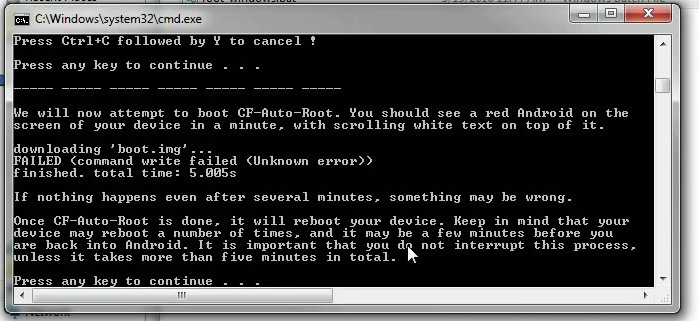
- Go into the uncompressed folder and run root-windows.bat or root-linux.sh…depending on the OS of your PC and press any key in the PC keyboard. If you see a warning “downloading ‘boot.img’ FAILED it means you must unlock your bootloader before to root your phone. If the warning is not shown the root process will run without problems and you will get rooted your device. The rooting process will be finished (Your device could be rebooted, don’t worry).
- (Only for users with locked bootloader):
In the “Windows terminal” you must run a command line. To make it, drag&drop fastboot-windows.exe (or other OS version file) to the “Windows terminal”, append boot after the path of the executable file and then drag&drop CF-Auto-Root-xxxxx.img file from image folder.
When the process finish your phone will be rebooted and it will be rooted.
Also you can to use the Magisk Method , for root Android 7, this method hides the root in applications that detect it.
Remember, you must ROOT your Android device at your own risk.
Legal conditions
Hexamob is not responsible for any damages caused directly or indirectly by a rooting method. Any action for rooting your device is done it only under your responsibility.
These problems occur because of rooting devices with unsafe methods and probably with the help of rooting apps. The worst part is, your warranty will be void after you root your android, so you can’t claim your warranty even if it is still not expired.
So, it is extremely risky to root your device without proper knowledge. If you are ready to take risk of bricking your device, you can root your android by those root apps, all you need is to download any app from the list of rooting apps for android, install it and root your device in one click.
But what about the safety of your device???
In traditional rooting apps, a single method/script is developed and used to root all the android devices, but it is not tested whether the method on all the devices. So, that method may work for some devices while it can cause serious damage to others. But, In our method, we develop the rooting script for each and every single device separately because of which you will have no chance of getting your device damaged and if IN CASE any problem arises with your device, we will assist you via live chat or Teamviewer.
1)PC with Windows 7/8/8.1/10 OR Mac
- All android versions supported from android 2.3 Gingerbread to Android 10.
- 100% guaranteed and 100% safe.
- 30-Days
Unlimited Remote Support that includes:
Unlimited Rooting (Re-Rooting, Un-rooting)
Unlimited OS Repairs (Soft Brick, Errors, Recovery)
Unlimited Android Support (Install Apps, Remove Bloatware) - 24/7 Live Chat – Lifetime Access.
Remember that, to provide you all these features, we need to work hard and we have to pay our employees. So, you are required to pay a small amount of $39.95 to root one device. If you have two devices to root you just need to pay $49.95 and three devices can be rooted by $59.95.
But If your device is not rooted you will get all your money back with our Money Back Guarantee policy.
So, let’s enter the topic directly.
How to root android Safely?
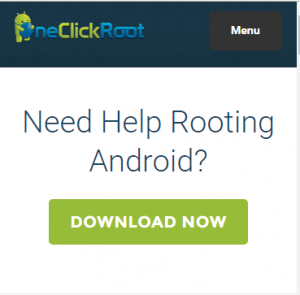
- At first, you have to be sure whether your device is fully supported or not. So, please Click Here to download our most advanced and secure OneClickRoot app. The app is available for both PC and Android devices.
Download OneClickRoot App
- You will be redirected to the Official Homepage of OneClickRoot. Tap on the “Download Now” button. Your download will start within some time.
4. Tap on “Scan Now”. This app will check if your device can be rooted or not.
5. If your device is compatible, you will see a Congratulations notice in a few seconds.
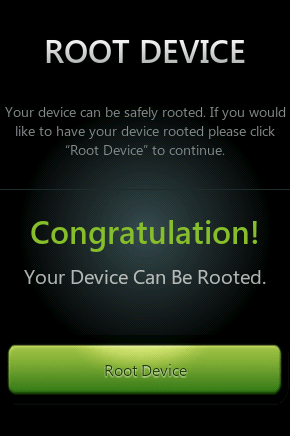
6. Tap on “Root Device” and you will see a “Register to root” window. Since you are paying to root, you should register for it.
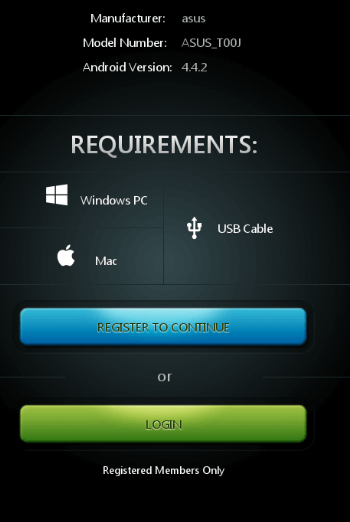
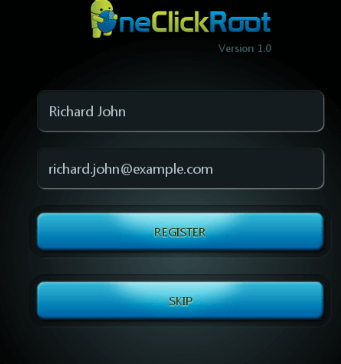
7. Enter your Name and Email to register.
8. Now, you will see “SHOPPING CART”, where you can enter the number of devices, if you need to root more than one devices, you can increase the number by clicking the “+” button.
Below that you can see “Include Warranty Protection for $19.95”. This means, even if you root your device, we will use a special method so that your warranty won’t be void and you can claim the warranty. We strongly recommend you to keep it ticked but you can untick it if you want.
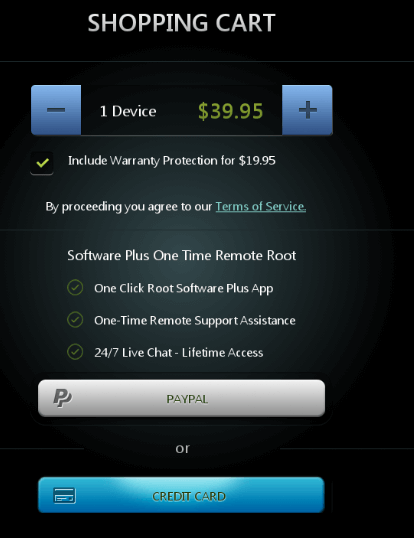
9. Please select whether you want to pay via credit card or Paypal. Now select the same browser you downloaded and you can fill your PayPal or credit card details. All your details will be 100% secure.
10. Select “Process Order”.
11. As you have now paid for One Click Root, you can ask help from the Oneclickroot team to root your device. We will help you via Teamviewer or Live Chat. Chat is available 24/7.
12. Now, fill any details asked and the required files will be downloaded to your phone and you will be asked to connect your android device to PC. Required files will be downloaded to PC too.
13. Finally, after some minutes your device will be successfully rooted. You can enjoy all features of rooted android without any risks.
If your device is not rooted or any error occurs, you can get help from our team 24/7 via Live chat or Teamviewer, and if you are still not satisfied, you can ask for a refund
Download the latest SuperSU Zip (SuperSU 2.82 Zip) and SuperSU APK (SuperSU 2.82 APK) for your Android device. SuperSU was developed and maintained by the legendary Android developer chainfire and is the go-to choice for Android enthusiasts to root their device.
What is SuperSU?
Android devices are and have always been pretty customizable when compared to other mobile operating systems (not that there’s much available now). Due to the open nature of the Android ecosystem, even the manufacturers customize the Android OS by adding their own skin on top, before shipping it to their customers. Android, by default, offers pretty decent customization options. Want to take it to the next level? Root your Android device!
Features
Below are the features that you can enjoy after installing SuperSU.
Open Source
SuperSU is completely open-source and its source code is available on Github. Anyone can contribute to its development!
Free
SuperSU is completely free. There are no hidden costs or catch to use SuperSU. Can be used on any number of devices you want!
Support
SuperSU supports a wide range of devices; thanks to the fact that it supports Android version 5.0 and above!
What is SuperSU APK?
What is SuperSU ZIP?
SuperSU Zip is the core of the SuperSU Rooting Framework where all the rooting magic happens. The SuperSU Rooting Framework which is responsible for rooting Android devices comes in the form of zip file. This file needs to be flashed via a custom Android recovery such as TWRP or CWM Recovery in order to root the Android device. Please note that SuperSU Zip will only help to root your Android device. Unlocked bootloader and a working custom recovery are the basic needs to use SuperSU Zip.
Download SuperSU ZIP v2.82
Why Root Android Using SuperSU ZIP?
The above heading has two questions in itself:
- Why root Android?
- Why root Android using SuperSU?
Rooting Android has several benefits. Here are some:
- You can customize the heck out of your device by using powerful tools like Xposed Framework.
- You can install various mods such as ViPER4Android, Dolby Atmos Sound Mod, etc.
- You can install a custom Kernel/ROM.
- Update your device to the latest Android version even after the official updates stop.
- Uninstall bloatware effortlessly.
And here’s why you should prefer SuperSU to root your Android:
- Reliable: SuperSU has been on the Android scene than any other method and it is super reliable.
- Works flawlessly: Supports almost all the Apps/MODs that require root privilege.
How to Install SuperSU Zip On Android?
- Make sure you have read the prerequisites section.
- Make sure you have setup ADB and Fastboot on your Windows or macOS.
- SuperSU Zip File: Copy the latest SuperSU Zip file which you have downloaded above to your phone.
- USB Debugging: Enable USB Debugging on your device if it is not enabled already.
- Connect your phone to your PC/Mac. If you get an ‘Allow USB Debugging’ prompt on your device > Check the Always Allow box and tap OK.
- Open Terminal on Windows/macOS/Linux:
PC: Go to the folder where ADB and Fastboot are installed. Right-click on the empty space on the folder > Select ‘Open command window here’ or ‘Open Powershell window here’.
Mac: Open your Applications folder, then open the Utilities folder. Open the Terminal application.
Linux: May vary between different distributions. Google is your guide! - Reboot to TWRP Recovery: The method to reboot your device into TWRP recovery may vary from device to device. But the below ADB command should get the job done on any device.
Windows: adb reboot recovery macOS/Linux: ./adb reboot recovery - Flash SuperSU Zip in TWRP: Once you are in TWRP –1. Tap on ‘Install’.
2. Browser and select the downloaded SuperSU Zip file.
3. ‘Swipe to confirm Flash’ to root Android using SuperSU zip file. - Done!
Once the installation completes, simply reboot your device. Once you reboot your device, you will find an app named SuperSU installed on your phone. This app lets you manage the Root Permissions on your device (Granting/revoking root permission to apps). You might need to update it. If you do, simply update it via Google Play Store.
How to check if your device has root?
Download a simple app called ‘Root checker’ from the Google Play store by clicking below:
Now you have the latest SuperSU on your Android. This is the easiest way to install SuperSU Zip on your Android device.
Download iRoot For Mobile (iRoot. apk)
APK File Name: iRoot 3.4.9.rar
APK File Size: 7.6MB
Android Version Supported: 2.3 or higher
Download iRoot_3.4.9 – Latest Version
APK File Name: iRoot 3.4.5.apk
APK File Size: 12.3 MB
Download iRoot_3.4.5
Download iRoot_3.0.3_160202_1000 – 5.5mb
Download iRoot 2.2.6_151020_2075
Download iRoot 2.2.4_150912_1000
Download iRoot 2.2.2_150523_1000
Download iRoot 2.2.0_150430_1000
Download iRoot 2.1.6_150306_1000
Download iRoot 2.1.4_150131_1000
Download iRoot 2.1.0_141231_1000
Download iRoot 2.0.7_141129_1000
Особенности процедуры
Также нелишним будет в настройках разрешить установку приложений из неизвестных источников. Если вы собираетесь включить Root-доступ на «Андроид» через персональный компьютер, то необходимо активировать режим отладки по USB.
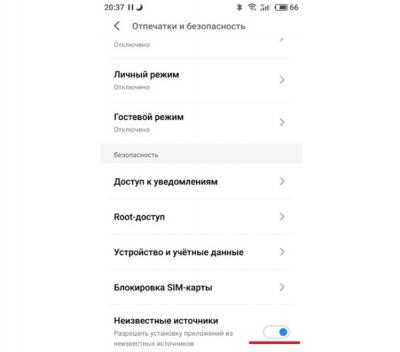
Установка из неизвестных источников:
- Открываем «Настойки» – «Отпечатки и безопасность».
- В нижней части списка передвигаем тумблер в активное положение в разделе «Неизвестные источники».
- Перезагружаем гаджет.
Режим отладки по USB:
- Открываем «Настройки» – «О телефоне».
- 6–7 раз кликаем на строке с версией прошивки, пока не появится сообщение «Теперь вы разработчик».
- Опять открываем «Настройки» – «Специальные возможности».
- Выбираем пункт «Для разработчиков».
- Переключаем тумблер в строке «Отладка по USB» в активное положение.
- Перезагружаем гаджет.
IRoot Apk file Information
- Latest App Version: 3.4.9
- Package: com.mygun.shua.su
- File Size: 12.4 MB
- Android Version Supported: 2.3 or higher
- Supported DPIs: nodpi
- Status: Working
Download iRoot 3. 3 Apk For Mobile (Latest Versions)
Удаление Root-доступа
Этот раздел также может понадобиться, особенно тем, кто хочет отнести свой гаджет в сервисный центр по гарантии, или если после рутирования появились какие-то серьезные проблемы в работе устройства. Для удаления прав администратора нам понадобится программа SuperSU. Найти ее можно на «Плей Маркете».
- Запустите утилиту и дождитесь, пока она определит модель гаджета и проверит наличие рут-прав.
- Перейдите во вкладку «Настройки».
- Кликнете по пункту «Полное удаление Root».
- Устройство зависнет на некоторое время и после перезагрузится.
- Во всплывающем окне должна появиться надпись, что удаление рут-прав прошло успешно.
Как получить рут-права?
Из нашей статьи вы узнаете, как получить Root-доступ на «Андроид» и какие инструменты для этого понадобятся. Разберем основные этапы данной процедуры и приведем несколько полезных советов. Последние помогут избежать критичных ошибок.
В качестве «подопытного» мы возьмем один из самых популярных гаджетов среднеценового сегмента – «Ксиоми Нот 3», включить Root-доступ на «Андроид» попробуем именно на нем. Но для начала проведем краткий ликбез, который для новичков явно не будет лишним.
How to Root from iRoot Tutorial
A-B-C Steps to Get Your Android Devices Rooted
After the full preparation, you are able to root the Android devices in 3 handy steps: Install and launch iRoot -> Enable USB Debugging -> Begin “Root”.
IRoot download – Rooting System Requirements
- Operating system should be between Android 2.2 or higher
- Windows platformed personal computer (For PC users only).
- A USB cable to connect PC and the smartphone
- Install the latest device USB driver software.
- Maintain over 50% of battery level.
Below we have provided all versions of iroot Android app (iroot.apk) which has been released till now.
iRoot also shows your device information, including Brand, Model, Android Version, Resolution, IMEI, System Storage, RAM and Internal Storage. You can see the Device Info Option, when you Tap on the Menu Icon > Tap to Open.
Особенности программы
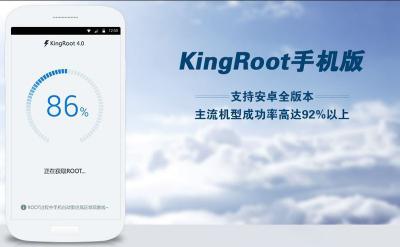
Дело в том, что утилита использует разные и не всегда совместимые один с другим алгоритмы рутирования. То есть они выполняются поочередно. Повторный запуск программы вполне может быть более успешным.

Также многие задаются вопросом: «А где найти Root-доступ на «Андроиде»?». Для того чтобы узнать, рутировано ваше устройство или нет, достаточно запустить KingRoot и на главном окне должна появится одна из надписей – Root access is unavailable или Root Succeeded. В первом случае права администратора не установлены, а во втором – успешно получены.
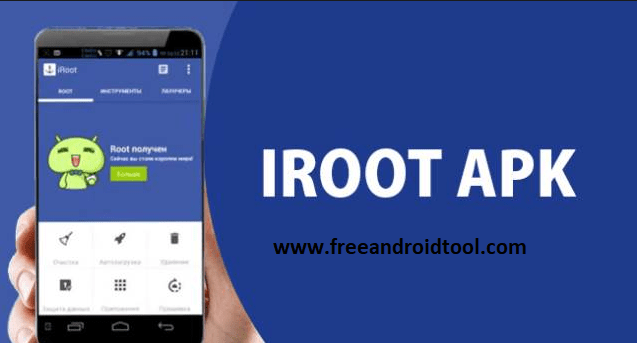
Download iRoot Android for the smooth rooting process
Like iRoot WindowsPC application, the iRoot android application has been created by the same developer Shenzhen. iRoot Apk for Android or even iRoot for PC, it is one of the best one-click rooting app available for both Android phones & Windows computer to get instant root access.
Looking for an easy way to root your Android smartphone or tablet, then using iRoot Android application is the best choice right now.
Some Important Points
Will this iRoot void the warranty of my Android phone?
Yes, so make sure that you prepare yourself, For most parts, iroot will not brick your device, if something went wrong you can revert back to the previous build.
Using iRoot application for rooting your android device will void its warranty. So, think well about it before using the iRoot tool.
Looking for a way to root your Android device using iRoot windows application, check out our iRoot Windows application page.
If this Root tool doesn’t work try –> iRoot for PC, SRSRoot, Kingo Root, Root Genius, Framaroot, Towelroot, 360 Root, KingRoot,
Know the Features iRoot Android App (iroot. apk)
1) Easy Rooting: iRoot Android application lets you to root your Android device by a tap on your smartphone or tablet screen. This is by far the easiest way to root your device.
2) App Recommendations: Once you finish rooting your Android device with iRoot, it offers app recommendations. All these recommended apps if used will improve the performance of your smartphone or tablet.
3) Internet Connection Required: Unlike Kingroot or Framaroot, iRoot requires internet connection to root your Android device. So, after installing the iroot.apk in your device, you will need to enable internet connection before using it for rooting your device.
4) No Data Loss: If you are using iRoot android application for rooting your smartphone or tablet, you won’t have to worry about the loss of data because the rooting procedure involving iRoot.apk isn’t a data loss process.
Последствия получения прав администратора
Но перед тем как установить Root-доступ на «Андроид» стоит знать, что вы можете причинить вред не только вашему гаджету, но и добавить себе головной боли.
Возможные последствия получения рут-прав:
- потеря гарантии;
- теряется возможность получения обновлений «по воздуху»;
- есть небольшая вероятность выхода из строя вашего устройства.
Так что, прежде чем включить Root-доступ на «Андроид» сто раз подумайте, а действительно ли вам это нужно? Вполне возможно, что для реализации поставленных задач найдутся какие-то специализированные приложения или другие инструменты, которые не затрагивают системные файлы платформы.
Зачем нужны Root, или права суперпользователя?
Подобные права необходимы для получения полного доступа к системе и ее файлам. Это позволяет модернизировать платформу «Андроид» под ваши нужды для выполнения каких-то специфических задач. Причем речь здесь идет не только о мобильных телефонах и планшетах, но и о других устройствах под управлением этой ОС.
К примеру, если включить Root-доступ для «Андроид» на ТВ-приставке, то вы сможете устанавливать на нее заметно больший перечень приложений: кодеки, менеджеры файлов, игры и прочий ранее недоступный или как-то ограниченный к инсталляции софт.
Возможности рутированного гаджета:
- тонкая настройка интерфейса (шрифты, анимация, иконки, размеры элементов и прочее);
- удаление встроенных разработчиком/производителем приложений;
- бесплатные покупки в игровых приложениях;
- резервное копирование всех файлов, в том числе и системных (для будущих экспериментов с платформой);
- блокировать встроенную рекламу («Алиэкспресс», службы такси и прочее);
- устанавливать программы на карту памяти.
Подготовка
Если вы собираетесь включить Root-доступ на «Андроид», то для начала стоит подготовить свое устройство к этой процедуре. Это позволит избежать потери важных данных, таких как контакты, пароли, рабочие файлы, какие-то заметки и прочее.
Перед рутированием устройства обязательно сделайте резервную копию важной для вас информации на внешний носитель. Эту процедуру можно выполнить как посредством специализированного софта, так и вручную местными средствами.
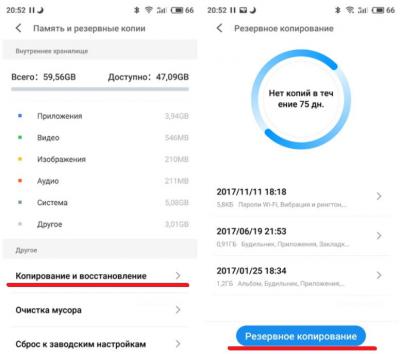
Создание резервной копии (рассмотрим на «Андроид 6.х»):
- Открываем «Настройки» – «Память и резервные копии».
- Кликаем по пункту «Копирование и восстановление».
- Затем вызываем окно «Резервное копирование».
- Утилита предложит вам выбрать место для сохранения (выбираем внешний накопитель).
- Ставим маячки на тех данных, которые необходимо скопировать.
- Соглашаемся с процедурой и дожидаемся ее окончания.
Также позаботьтесь о том, чтобы ваш гаджет был заряжен как минимум на 80%. Если процесс получения прав суперпользователя прервется по причине севшей батареи, то есть отключения девайса, то вероятность «окирпичивания» вашего устройства вырастает в разы.
About iRoot App
- iRoot android root tool released by Magyun team, the developers of the vroot one-click-rooting tool.
- This is a more powerful Android rooting tool with working at the highest success rate among all the rooting tools.
- Beat limitations and confines to access all around the Android system, flash Custom ROM and Kernels, Remove unnecessary advertisements, Install a myriad of third-party apps plus boost device performances are the key features of iroot-download.
- There are over 292,000,000 successfully rooted devices have activated at the present day society. iRoot download links are available below (direct links )
- iRoot Android application offers the simplest way to root your Android device i.e., it will let you root your smartphone or tablet just by a tap on your smartphone screen.
Получение прав администратора с мобильного устройства
Данное приложение совместимо практически со всеми популярными марками смартфонов. Разработчик заверяет, что шанс «окирпичивания» устройства при использовании его софта крайне мал – порядка 0,1 %. Судя по отзывам пользователей, так оно и есть: на сотню юзеров только один или два жаловались на полностью испорченный гаджет. Да и то после разбирательств выяснялось, что были нарушены некоторые условия и пункты получения рут-прав.

- Скачайте приложение на свое устройство и установите его.
- Запустите программу и дождитесь окончания анализа вашего гаджета.
- Если на главном окне есть надпись Root access is unavailable, то нажмите на кнопку Try to Root.
- Дождитесь окончания процесса рутирования (время зависит от производительности устройства).
- Если операция прошла успешно, то появится надпись Root Succeeded.
- Перезагрузите ваше устройство.
Иногда могут возникнуть некоторые проблемы при рутировании, вместо надписи об удачном получении прав администратора программа выдает логи с ошибками. На это часто жалуются обладатели гаджетов от «Самсунга». Бренд и его фирменные прошивки обеспечивают более надежную защиту системы от подобного рода «проникновений», поэтому программу можно попробовать запустить еще раз.
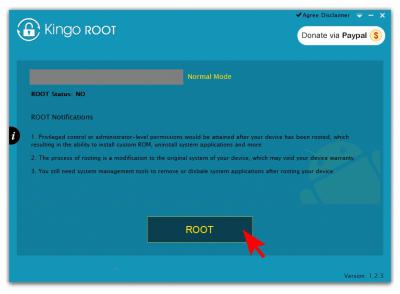
Получение прав администратора с ПК
Продвинутые пользователи считают рутирование через персональный компьютер более надежным, да и вероятность успешного получения прав администратора в этом случае выше. Судя по отзывам, программу Kingo Android Root можно назвать самым популярным, а вместе с тем и эффективным инструментом.
Разработчики данного софта занимаются поиском уязвимостей платформы «Андроид», так что дело они свое знают, и какие-то серьезные промашки за ними замечены не были. Найти программу можно на их официальном ресурсе.
- Подключите мобильное устройство через USB-интерфейс (должна быть включена отладка по USB на телефоне).
- Дождитесь пока программа определит ваш девайс и установит соответствующие драйвера (проверьте соединение с интернетом).
- На мобильном гаджете во всплывающем окне разрешите подключение нажав на кнопку ОК.
- Уже на компьютере должно появиться основное окно с крупной кнопкой ROOT в нижней части.
- Нажмите на нее, дождитесь окончания процесса рутирования (время зависит от производительности вашего мобильного устройства).
- В случае успешного выполнения процедуры появится надпись Root Succeeded!
- Отключите USB-кабель и перезагрузите ваш мобильный гаджет.
Программа работает с большим перечнем смартфонов, планшетов, ТВ-приставок и других устройств под управлением платформы «Андроид». Если же утилита не смогла определить модель вашего девайса или нужных драйверов не нашлось, то в этом случае стоит поискать фирменное приложение от производителя для синхронизации. Найти его можно на официальном сайте бренда. Если же у вас ультрабюджетное noname-устройство из Китая, то лучше получать права администратора первым способом, то есть непосредственно с телефона.
")


")