In this tutorial, we’ll learn how to create a self-signed certificate with OpenSSL.
Openssl is a handy utility to create self-signed certificates. You can use OpenSSL on all the operating systems such as Windows, MAC, and Linux flavors.
Overview
In this tutorial, we’ll be looking at what are the .crt and the .key files in the context of an HTTPS server. Additionally, we’ll also look at how we can generate them using openssl.
If you want to send or receive messages signed by root authorities and these authorities are not installed on the server, you must add a trusted root certificateA certificate issued by a trusted certificate authority (CA). In the SSL, anyone can generate a signing key and sign a new certificate. manually.
onFebruary 25, 2020 •
Adding custom root CA certificates to Debian is rather easy, but there are some non-obvious pitfalls that you might encounter. Here I’ve tried to collect most things to a single post for your convenience.
Adding Custom Root CA Certificates
But for claritys sake, I recommend that you create a subdirectory for each CA which makes things easier to keep track off.
Then copy your root CA certificate into the folder you just created. Debian only supports certificates in the X509 form, aka. .crt, so if your certificate is in the .cer format, see my guide on how to convert it below.
Then you’ll need to run the update-ca-certificates command to make Debian load the certificates into it’s Trusted Root Certificate Store.
sudo update-ca-certificates
You should see an output similar to this
Updating certificates in /etc/ssl/certs...
1 added, 0 removed; done.
Running hooks in /etc/ca-certificates/update.d...
done.
Converting Certificates to .crt
Sometimes you’ll run into the problem that the root CA certificate that has been provided to you isn’t in the .crt format, but instead in the similar but not quite equivalent .cer format. Converting them is however quite easy using OpenSSL, just make sure that you use the full filepath for the .cer certificate.
Removing your custom root CA certificate is even simpler, just delete the certificate from the folder you created earlier, and then ask Debian to update the CA certificate store, but completely this time
sudo update-ca-certificates --fresh
Categories: linux, Tech
Create Root CA (Done once)
Create Root Key
Attention: this is the key used to sign the certificate requests, anyone holding this can sign certificates on your behalf. So keep it in a safe place!
openssl genrsa -des3 -out rootCA.key 4096
If you want a non password protected key just remove the -des3 option
Here we used our root key to create the root certificate that needs to be distributed in all the computers that have to trust us.
Create a certificate (Done for each server)
Create the certificate key
openssl genrsa -out mydomain.com.key 2048
Create the signing (csr)
The certificate signing request is where you specify the details for the certificate you want to generate. This request will be processed by the owner of the Root key (you in this case since you create it earlier) to generate the certificate.
Important: Please mind that while creating the signign request is important to specify the Common Name providing the IP address or domain name for the service, otherwise the certificate cannot be verified.
I will describe here two ways to gener
Method A (Interactive)
If you generate the csr in this way, openssl will ask you questions about the certificate to generate like the organization details and the Common Name (CN) that is the web address you are creating the certificate for, e.g mydomain.com.
Append your trusted certificate to file /etc/pki/tls/certs/ca-bundle.crt
> /etc/pki/tls/certs/ca-bundle.crt»>
cat foo.crt /etc/pki/tls/certs/ca-bundle.crt
Solaris
Solaris-specific Solaris keeps the CA certs in «/etc/certs/CA/». Hashed links to the CA certs are in «/etc/openssl/certs/» for fast lookup and access (usually by OpenSSL).
By convention, but not required, the filenames in «/etc/certs/CA» is the cert holder’s CN with spaces replaced by underscores («_») and appended with a .pem file name extension. For example, file «/etc/certs/CA/foo.pem» contains the cert for CN «VeriSign Class 4 Public Primary Certification Authority — G3».
Add
Make or verify the cert is world-readable, if not already.
chmod a+r foo.pem ls -l foo.pem
Copy the cert to directory «/etc/certs/CA».
cp -p foo.pem /etc/certs/CA/
Install he cert into «/etc/certs/ca-certificates.crt» and add a hashed link in «/etc/openssl/certs/».
/usr/sbin/svcadm restart /system/ca-certificates
Verify
Verify the CA cert service has restarted (and processed your new CA cert).
/usr/sbin/svcs /system/ca-certificates
If the service hasn’t started it could be the cert is corrupt or is a duplicate of an existing CA cert. Look for error messages in files «/var/svc/log/system-ca-certificates:default.log» and «/system/volatile/system-ca-certificates:default.log»
Firefox Browser
Firefox has its own certificate store.
Advanced -> Certificates»>
Firefox Options -> Advanced -> Certificates
JVM / Java Keystore
Java uses the popular «Java KeyStore (JKS)», it does not use the trusted-root-certificates of the operating system.
### Atlassian Frameworks: Jira and Confluence bring their own version of java. # /confluence/jre/lib/security/cacerts # /jira/jre/lib/security/cacerts»>
keytool -import -alias CERT_ALIAS_NAME -keystore /usr/java/jdkXXXX/jre/lib/security/cacerts -file foo.crt## Atlassian Frameworks: Jira and Confluence bring their own version of java.
Links of interest (Acrobat, Android, etc)
How can I trust CAcert’s root certificate?: http://wiki.cacert.org/FAQ/ImportRootCert
How to add trusted Root-Certificates
How-to: Adding trusted root certificates to the SO (Win / MAC / Unix).
Feel totally free to edit this page to add another operating systems!
How-to list all available ssl CA certificates in Linux.
Append your trusted certificate to file /etc/pki/tls/certs/ca-bundle.crt
> /etc/pki/tls/certs/ca-bundle.crt»>
cat foo.crt /etc/pki/tls/certs/ca-bundle.crt
Solaris
Solaris-specific Solaris keeps the CA certs in «/etc/certs/CA/». Hashed links to the CA certs are in «/etc/openssl/certs/» for fast lookup and access (usually by OpenSSL).
By convention, but not required, the filenames in «/etc/certs/CA» is the cert holder’s CN with spaces replaced by underscores («_») and appended with a .pem file name extension. For example, file «/etc/certs/CA/foo.pem» contains the cert for CN «VeriSign Class 4 Public Primary Certification Authority — G3».
Add
Make or verify the cert is world-readable, if not already.
chmod a+r foo.pem ls -l foo.pem
Copy the cert to directory «/etc/certs/CA».
cp -p foo.pem /etc/certs/CA/
Install he cert into «/etc/certs/ca-certificates.crt» and add a hashed link in «/etc/openssl/certs/».
/usr/sbin/svcadm restart /system/ca-certificates
Verify
Verify the CA cert service has restarted (and processed your new CA cert).
/usr/sbin/svcs /system/ca-certificates
If the service hasn’t started it could be the cert is corrupt or is a duplicate of an existing CA cert. Look for error messages in files «/var/svc/log/system-ca-certificates:default.log» and «/system/volatile/system-ca-certificates:default.log»
Firefox Browser
Firefox has its own certificate store.
Advanced -> Certificates»>
Firefox Options -> Advanced -> Certificates
JVM / Java Keystore
Java uses the popular «Java KeyStore (JKS)», it does not use the trusted-root-certificates of the operating system.
### Atlassian Frameworks: Jira and Confluence bring their own version of java. # /confluence/jre/lib/security/cacerts # /jira/jre/lib/security/cacerts»>
keytool -import -alias CERT_ALIAS_NAME -keystore /usr/java/jdkXXXX/jre/lib/security/cacerts -file foo.crt## Atlassian Frameworks: Jira and Confluence bring their own version of java.
Links of interest (Acrobat, Android, etc)
How can I trust CAcert’s root certificate?: http://wiki.cacert.org/FAQ/ImportRootCert
View Certificates
We can use the openssl command to view the contents of our certificate in plain text:
openssl x509 -text -noout -in domain.crt
The output will look like:
Certificate: Data: Version: 1 (0x0) Serial Number: 64:1a:ad:0f:83:0f:21:33:ff:ac:9e:e6:a5:ec:28:95:b6:e8:8a:f4 Signature Algorithm: sha256WithRSAEncryption Issuer: C = AU, ST = stateA, L = cityA, O = companyA, OU = sectionA, CN = domain, emailAddress = [email protected] Validity Not Before: Jul 12 07:18:18 2021 GMT Not After : Jul 12 07:18:18 2022 GMT Subject: C = AU, ST = stateA, L = cityA, O = companyA, OU = sectionA, CN = domain, emailAddress = [email protected] Subject Public Key Info: Public Key Algorithm: rsaEncryption RSA Public-Key: (2048 bit) Modulus: 00:a2:6a:2e:a2:17:68:bd:83:a1:17:87:d8:9c:56: ab:ac:1f:1e:d3:32:b2:91:4d:8e:fe:4f:9c:bf:54: aa:a2:02:8a:bc:14:7c:3d:02:15:a9:df:d5:1b:78: 17:ff:82:6b:af:f2:21:36:a5:ad:1b:6d:67:6a:16: 26:f2:a9:2f:a8:b0:9a:44:f9:72:de:7a:a0:0a:1f: dc:67:b0:4d:a7:f4:ea:bd:0e:83:7e:d2:ea:15:21: 6d:8d:18:65:ed:f8:cc:6a:7f:83:98:e2:a4:f4:d6: 00:b6:ed:69:95:4e:0d:59:ee:e8:3f:e7:5a:63:24: 98:d1:4b:a5:c9:14:a5:7d:ef:06:78:2e:08:25:3c: fd:05:0c:67:ce:70:5d:34:9b:c4:12:e6:e3:b1:04: 6a:db:db:e9:47:31:77:80:4f:09:5e:25:73:75:e4: 57:36:34:f8:c3:ed:a2:21:57:0e:e3:c1:5c:fc:d9: f2:a3:b1:d9:d9:4f:e2:3e:ad:21:77:20:98:ed:15: 39:99:1b:7e:29:60:14:eb:76:8b:8b:72:16:b1:68: 5c:10:51:27:fa:41:49:c5:b7:c4:79:69:5e:28:a2: c3:55:ac:e8:05:0f:4b:4a:bd:4b:2c:8b:7d:92:b0: 2d:b3:1a:de:9f:1a:5b:46:65:c6:33:b2:2e:7a:0c: b0:2f Exponent: 65537 (0x10001) Signature Algorithm: sha256WithRSAEncryption 58:c0:cd:df:4f:c1:0b:5c:50:09:1b:a5:1f:6a:b9:9a:7d:07: 51:ca:43:ec:ba:ab:67:69:c1:eb:cd:63:09:33:42:8f:16:fe: 6f:05:ee:2c:61:15:80:85:0e:7a:e8:b2:62:ec:b7:15:10:3c: 7d:fa:60:7f:ee:ee:f8:dc:70:6c:6d:b9:fe:ab:79:5d:1f:73: 7a:6a:e1:1f:6e:c9:a0:ae:30:b2:a8:ee:c8:94:81:8e:9b:71: db:c7:8f:40:d6:2d:4d:f7:b4:d3:cf:32:04:e5:69:d7:31:9c: ea:a0:0a:56:79:fa:f9:a3:fe:c9:3e:ff:54:1c:ec:96:1c:88: e5:02:d3:d0:da:27:f6:8f:b4:97:09:10:33:32:87:a8:1f:08: dc:bc:4c:be:6b:cc:b9:0e:cf:18:12:55:17:44:47:2e:9c:99: 99:3c:96:60:12:c6:fe:b0:ee:01:97:54:20:b0:13:51:4f:ee: 1d:c0:3d:1a:30:aa:79:30:12:e2:4f:af:13:85:f8:c8:1e:f5: 28:7c:55:66:66:10:f4:0a:69:c0:55:8a:9a:c7:eb:ec:15:f0: ef:bd:c1:d2:47:43:34:72:71:d2:c3:ff:f0:a3:c1:2c:63:56: f2:f5:cf:91:ec:a1:c0:1f:5d:af:c0:8e:7a:02:fe:08:ba:21: 68:f2:dd:bd
Linux (CentOs 6)
Restart to reload the certificates in the 32-bit version.
Shell Script To Create Self-Signed Certificate
#! /bin/bash
if [ "$#" -ne 1 ]
then echo "Error: No domain name argument provided" echo "Usage: Provide a domain name as an argument" exit 1
fi
DOMAIN=$1
# Create root CA & Private key
openssl req -x509 \ -sha256 -days 356 \ -nodes \ -newkey rsa:2048 \ -subj "/CN=${DOMAIN}/C=US/L=San Fransisco" \ -keyout rootCA.key -out rootCA.crt
# Generate Private key
openssl genrsa -out ${DOMAIN}.key 2048
# Create csf conf
cat > csr.conf <<EOF
[ req ]
default_bits = 2048
prompt = no
default_md = sha256
req_extensions = req_ext
distinguished_name = dn
[ dn ]
C = US
ST = California
L = San Fransisco
O = MLopsHub
OU = MlopsHub Dev
CN = ${DOMAIN}
[ req_ext ]
subjectAltName = @alt_names
[ alt_names ]
DNS.1 = ${DOMAIN}
DNS.2 = www.${DOMAIN}
IP.1 = 192.168.1.5
IP.2 = 192.168.1.6
EOF
# create CSR request using private key
openssl req -new -key ${DOMAIN}.key -out ${DOMAIN}.csr -config csr.conf
# Create a external config file for the certificate
cat > cert.conf <<EOF
authorityKeyIdentifier=keyid,issuer
basicConstraints=CA:FALSE
keyUsage = digitalSignature, nonRepudiation, keyEncipherment, dataEncipherment
subjectAltName = @alt_names
[alt_names]
DNS.1 = ${DOMAIN}
EOF
# Create SSl with self signed CA
openssl x509 -req \ -in ${DOMAIN}.csr \ -CA rootCA.crt -CAkey rootCA.key \ -CAcreateserial -out ${DOMAIN}.crt \ -days 365 \ -sha256 -extfile cert.conf
chmod +x ssl.sh
Execute the script with the domain name or IP. For example,
./ssl.sh demo.mlopshub.com
The script will create all the certificates and keys we created using the individual commands. The SSL certificate and private keys get named with the domain name you pass as the script argument. For example, demo.mlopshub.com.key & demo.mlopshub.com.crt
Self-Signed Certificates in Organizations
Many organizations use self-signed certificated for their internal applications that are not internet-facing. These certificates are generated using the organization’s internal PKI infrastructure.
DevOps teams and developers can request SSL certificates from the PKI infrastructure to be used in applications.
Linux (CentOs 5)
Restart to reload the certificates in the 32-bit version.
Creating a CA-Signed Certificate With Our Own CA
We can be our own certificate authority (CA) by creating a self-signed root CA certificate, and then installing it as a trusted certificate in the local browser.
5.1. Create a Self-Signed Root CA
Let’s create a private key (rootCA.key) and a self-signed root CA certificate (rootCA.crt) from the command line:
As a result, the CA-signed certificate will be in the domain.crt file.
Self-Signed Certificate FAQ’s
How to create self-signed certificated on Windows?
How do I get a self-signed certificate?
Self-signed certificate can be generated by you using tools like openSSL or CDSSL PKI toolkit.
The Certificate and Private Key Files
On the other hand, the private key file is a file containing the private part of the public-private key pair. Whenever the server receives any incoming HTTPS request, it decrypts the data using this private key.
Let’s look at some sample configurations from different servers. In Nginx, here’s how we would configure the ngx_http_ssl_module to enable HTTPS:
In Apache, the equivalent would look something like this:
SSLEngine on SSLCertificateFile "example.com.cert" SSLCertificateKeyFile "example.com.key"
Summary
In this tutorial, we’ve looked at the certificate (.crt) and private key (.key) files that are essential for setting up an HTTPS server. Additionally, we’ve also talked briefly about the difference between self-signed certificates as compared to certificates signed by an external CA. Finally, we’ve learned some openssl commands for generating keys, self-signed certificates, and certificate signing requests.
What are the drawbacks of using a self-signed certificate?
There are also several drawbacks of using a self-signed certificate:
Your users will need to install the certificate in their browsers or applications.
Your users will need to trust your certificate authority manually.
They unsafe for public facing applications.
None of the browsers or operating systems trust the self-signed certificates unless the user installs them.
Prone to man-in-the-middle attacks.
In general, self-signed certificates are a good option for applications in which you need to prove your own identity. They’re also a good option for development and testing environments. However, they shouldn’t be used for production applications.
What is a Self Signed Certificate?
A self-signed certificate is an SSL/TSL certificate not signed by a public or private certificate authority. Instead, it is signed by the creator’s own personal or root CA certificate.
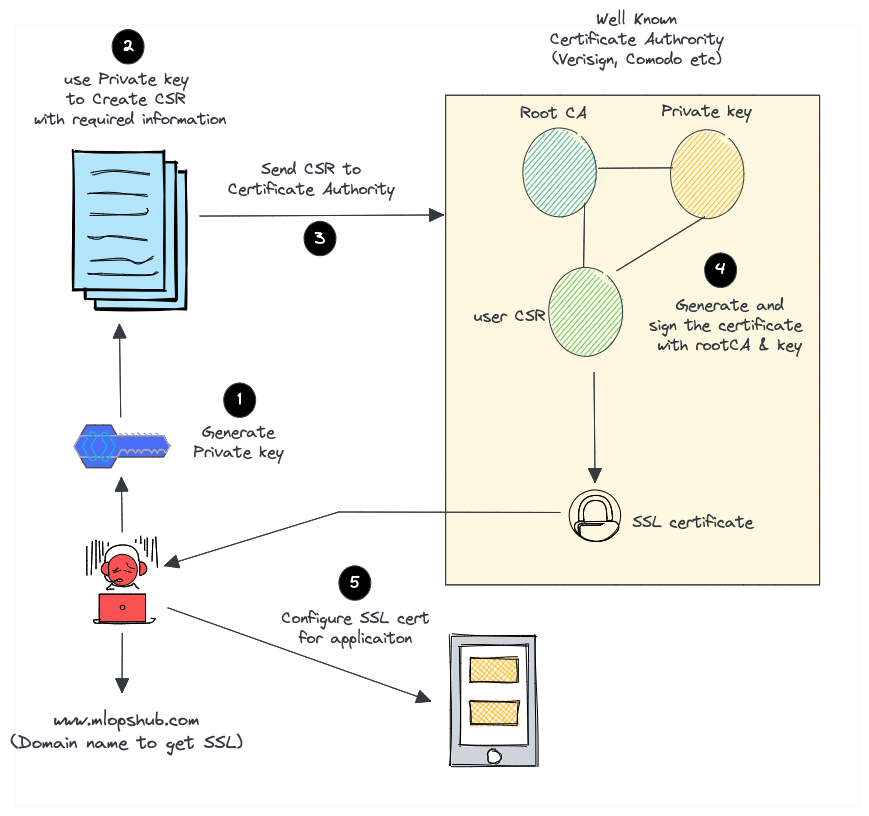
Here is what we do to request paid SSL/TLS certificate from a well-known Certificate Authority like Verisign or comodo.
Create a certificate signing request (CSR) with a private key. A CSR contains details about location, organization, and FQDN (Fully Qualified Domain Name).
Send the CSR to the trusted CA authority.
The CA authority will send you the SSL certificate signed by their root certificate authority and private key.
You can then validate and use the SSL certificate with your applications.
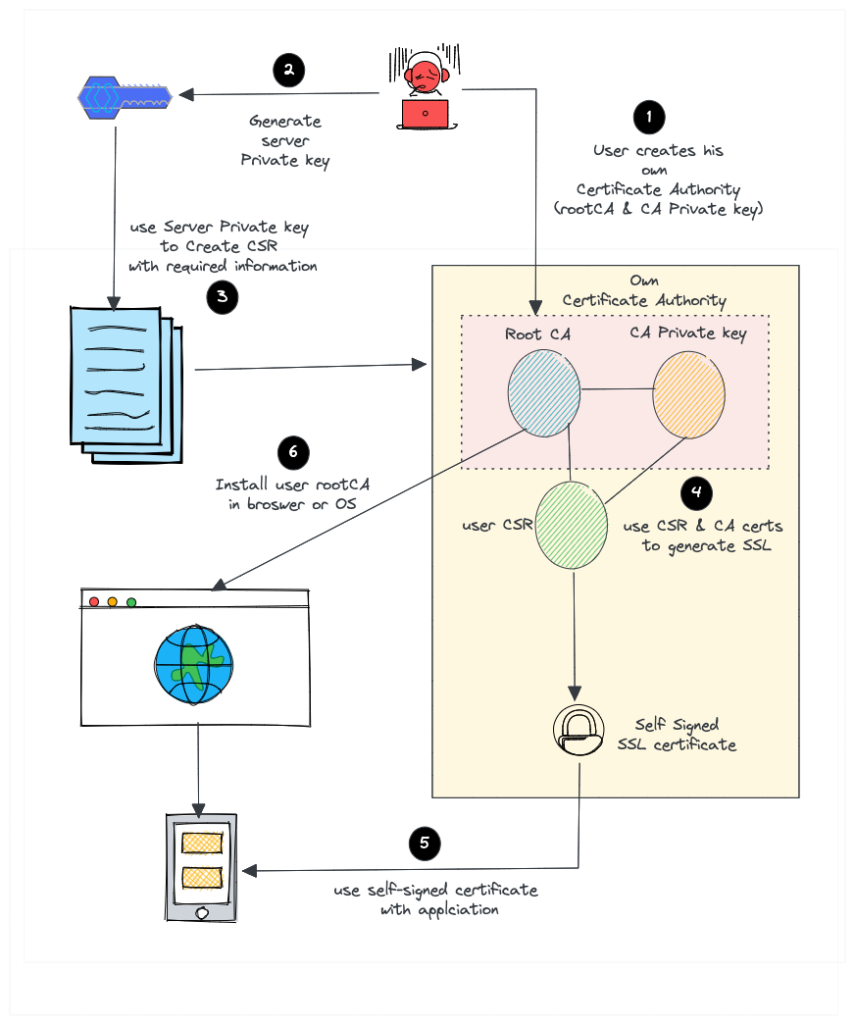
But for a self-signed certificate, here is what we do.
Create our own root CA certificate & CA private key (We act as a CA on our own)
Create a server private key to generate CSR
Create an SSL certificate with CSR using our root CA and CA private key.
Install the CA certificate in the browser or Operating system to avoid security warnings.
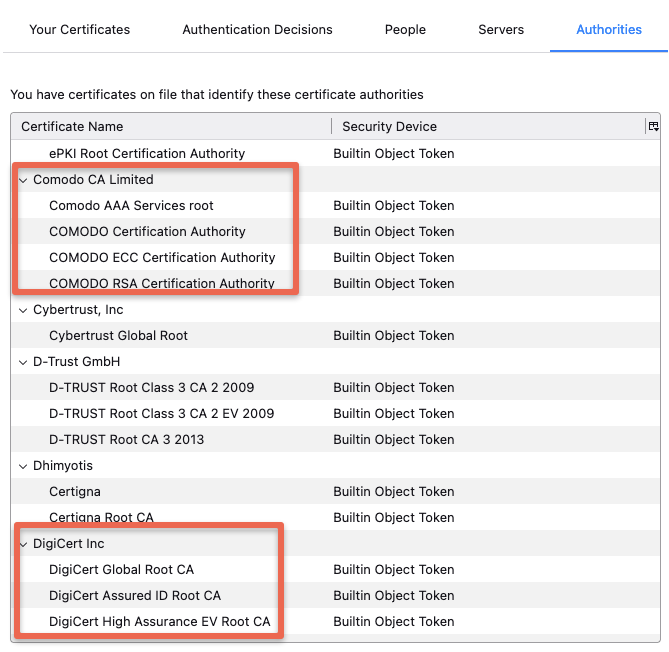
Most browsers & operating systems hold a copy of root CA certificates of all the trusted certified Certificated Authorities. That’s the reason the browsers won’t show any security messages when you visit standard websites that use SSL from a trusted and well-known commercial Certificate authority.
At the same time, if you use a self-signed certificate, your browser will throw a security warning. The reason is browsers only trust SSL from a trusted Certificate authority. For example,
Your connection is not private
Attackers might be trying to steal your information from demo.apps.mlopshub.com (for example, passwords, messages or credit cards)
Also, you can use this CA to create more than one SSL certificate.
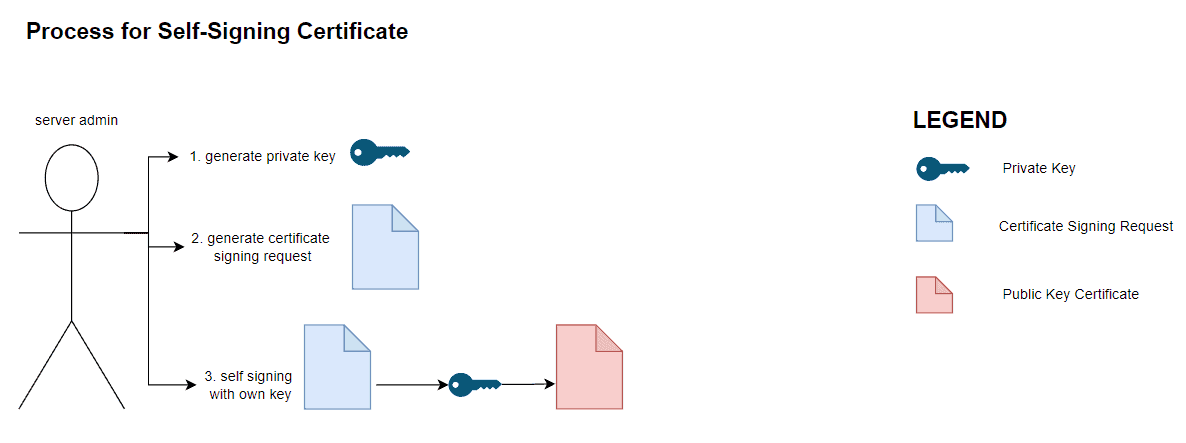
Generating a Private Key and Self-Signed Certificate Files
On a high level, the process starts by us generating a private key using the openssl‘s genrsa command. After that, we’ll create a certificate signing request for our server. To generate a public-key certificate from a certificate signing request document, we’ll have a certificate authority to sign on it.
Since we are not interested in an external certificate authority in this process, we’ll create our own root certificate authority by generating a self-signed certificate. Finally, we can obtain the public-key certificate by signing the certificate request document using the root certificate authority we’ve generated in the earlier steps.
The details of the process can be found in another article on the site.
Obtaining a Certificate File and Private Key
The process of generating the certificate and private key files is rather straightforward through the use of several commands. However, depending on the purpose of the certificate (either production usage or local testing), we’ll have to go through different processes.
Firstly, for certificates that are intended for local development and testing, we can create and sign the certificate ourselves:
Difference Between Self Signed Certificate and CA Signed Certificate
On the other hand, a self-signed certificate does not bear the name of these reputable certificate authorities and therefore is not as trustable. When they are presented to connecting browsers and clients, they’ll prompt a variation of the “Invalid Certificate Authority” error. For example, here’s how Firefox will display the error:
One thing to note about engaging external certificate authorities is that most of them charge a fee for signing certificates. One exception is Letsencrypt which would sign certificates for free provided that the authenticity of the certificates is validated through challenges.
What are the benefits of using a self-signed certificate?
There are several benefits of using a self-signed certificate:
You don’t need to rely on a third party to sign your certificate.
You can create and use your own certificate authority.
You don’t have to pay for a certificate from a CA.
You have more control over your certificates.
Convert Certificate Formats
Our certificate (domain.crt) is an X.509 certificate that’s ASCII PEM-encoded. We can use OpenSSL to convert it to other formats for multi-purpose use.
7.1. Convert PEM to DER
The DER format is usually used with Java. Let’s convert our PEM-encoded certificate to a DER-encoded certificate:
openssl x509 -in domain.crt -outform der -out domain.der
7.2. Convert PEM to PKCS12
PKCS12 files, also known as PFX files, are usually used for importing and exporting certificate chains in Microsoft IIS.
Restart to reload the certificates in the 32-bit versions or Debian 7.
Creating a Certificate Signing Request
If we want our certificate signed, we need a certificate signing request (CSR). The CSR includes the public key and some additional information (such as organization and country).
Let’s create a CSR (domain.csr) from our existing private key:
openssl req -key domain.key -new -out domain.csr
We’ll enter our private key password and some CSR information to complete the process. The output will look like:
Enter pass phrase for domain.key:
You are about to be asked to enter information that will be incorporated
into your certificate request.
What you are about to enter is what is called a Distinguished Name or a DN.
There are quite a few fields but you can leave some blank
For some fields there will be a default value,
If you enter '.', the field will be left blank.
-----
Country Name (2 letter code) [AU]:AU
State or Province Name (full name) [Some-State]:stateA
Locality Name (eg, city) []:cityA
Organization Name (eg, company) [Internet Widgits Pty Ltd]:companyA
Organizational Unit Name (eg, section) []:sectionA
Common Name (e.g. server FQDN or YOUR name) []:domain
Email Address []:[email protected]Please enter the following 'extra' attributes
to be sent with your certificate request
A challenge password []:
An optional company name []:
An important field is “Common Name,” which should be the exact Fully Qualified Domain Name (FQDN) of our domain.
“A challenge password” and “An optional company name” can be left empty.
We can also create both the private key and CSR with a single command:
First, we’ll create a private key. A private key helps to enable encryption, and is the most important component of our certificate.
Let’s create a password-protected, 2048-bit RSA private key (domain.key) with the openssl command:
openssl genrsa -des3 -out domain.key 2048
We’ll enter a password when prompted. The output will look like:
Generating RSA private key, 2048 bit long modulus (2 primes)
.....................+++++
.........+++++
e is 65537 (0x010001)
Enter pass phrase for domain.key:
Verifying - Enter pass phrase for domain.key:
If we want our private key unencrypted, we can simply remove the -des3 option from the command.
Openssl
The openssl command is a command-line tool that implements the SSL/TLS network protocols. Additionally, it also contains commands that support the secure network protocol, such as generating a public-private key pair, creating a certificate signing request, and decoding the certificate file. In this tutorial, we’ll be using this tool extensively.
To install, simply use the package manager of our Linux distro. For example, we can install openssl with apt-getin Ubuntu:
Running the openssl version command would allow us to quickly verify the installation:
$ openssl version
OpenSSL 1.1.1f 31 Mar 2020
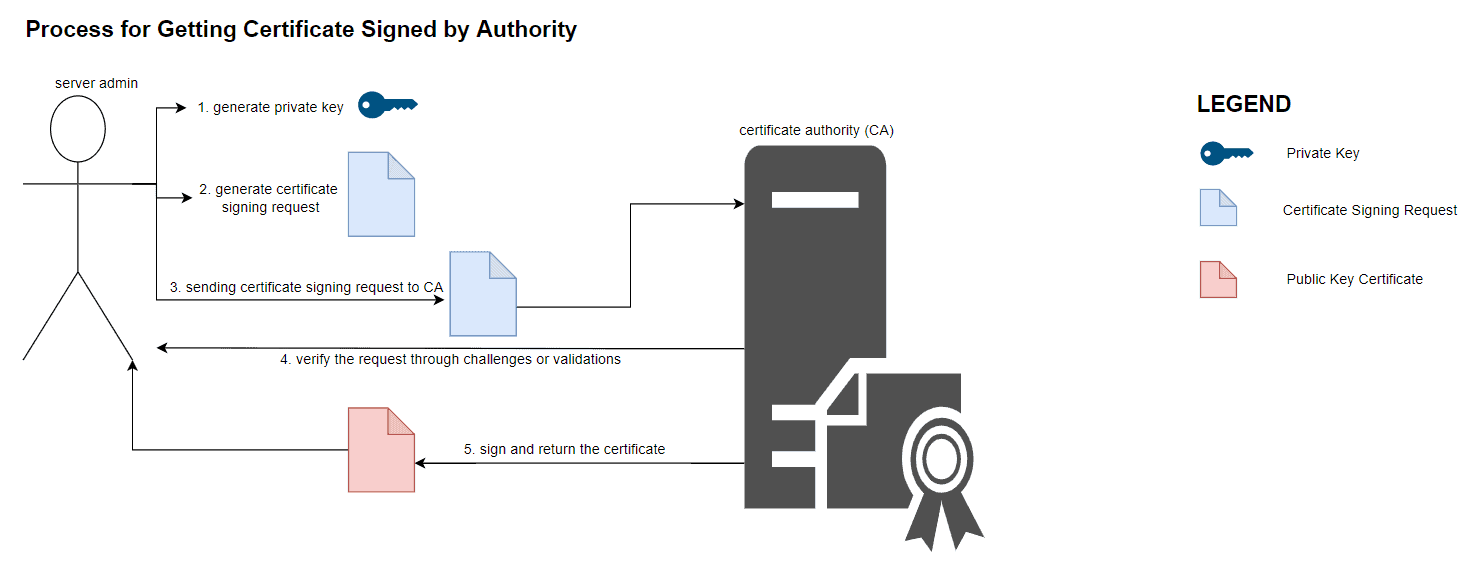
The process of generating a certificate file that’s signed by an external reputable certificate authority is slightly different. Instead of generating a certificate file ourselves, we’ll generate a certificate signing request (CSR) and hand it over to the certificate authority for their signature. Let’s look at the steps for generating a CSR in the sections below.
6.1. Generating a Private Key
Regardless of whether a certificate is self-signed or signed by a certificate authority, we’ll first need to generate a private key which we’ll keep:
$ openssl genrsa 2048 > example.com.key
6.2. Generating a Certificate Signing Request (CSR)
To generate a certificate signing request, we use the req subcommand from the openssl toolkit:
When we invoke, the command will prompt us for the details of the entity we are generating the certificate for.
Using the openssl req command, we can inspect the content of the certificate signing request:
$ Certificate Request: Data: Version: 1 (0x0) Subject: C = US, ST = New York, L = New York City, O = Awesome Tech, OU = Engineering, CN = example.com, emailAddress = [email protected] Subject Public Key Info: Public Key Algorithm: rsaEncryption RSA Public-Key: (2048 bit) Modulus: 00:9f:31:cb:05:27:01:88:1a:1e:4d:3b:d0:8f:13: b9:23:72:70:0d:a5:ec:ca:dc:51:5c:a6:74:6e:d9: 6d:4d:05:dc:4f:fc:1d:85:3f:86:16:a0:37:a9:25: 8f:6e:a3:33:3e:79:6e:09:d6:af:cf:33:9f:e7:07: 2a:ec:57:f9:44:45:9b:e9:93:fa:29:c4:3a:81:01: 10:8c:cd:e2:49:76:dc:0b:a3:5a:45:0a:c4:f0:bd: c9:52:a1:02:1f:01:e9:f9:94:3f:52:79:eb:e4:8d: 33:c8:d0:4a:bb:59:e5:11:96:fe:7e:d2:91:c4:95: a3:73:84:59:2b:c1:0b:b0:84:b2:d6:a1:b6:b4:eb: 24:52:30:2a:91:de:88:9a:51:21:da:92:90:85:c9: 22:63:87:04:f6:31:34:f8:a6:74:cf:9f:c8:7c:05: 94:53:7d:82:17:2f:53:15:9d:3c:91:1e:3e:97:02: 7c:46:97:18:eb:4b:f4:33:b6:5d:0a:5b:6d:17:a5: 09:59:4f:ff:f8:8a:bf:10:20:f0:00:e8:5e:90:ec:
(TRUNCATED)
Compared to the self-signed certificate, the certificate signing request does not have an Issuer attribute. This is because this document is not a certificate but a certificate signing request document. Then, we can pass this file to any of the publicly available certificate authorities for their signature. Depending on the authority, different validations and challenges might apply in order to validate the authenticity of the certificates.
Create Certificate Authority
As discussed earlier, we need to create our own root CA certificate for browsers to trust the self-signed certificate. So let’s create the root CA certificate first.
Let’s create a directory named openssl to save all the generated keys & certificates.
In this guide, we have learned how to create self-signed SSL certificates using OpenSSL.
For production use cases, if you don’t want to spend money on SSL certificates, you can try out Letsencrypt.
Hope this self-signed SSL guide was helpful with the script to automate the certificate generation. Do let us know if you face any issues.
Also, SSL/TLS is one of the important topics in DevOps. You can check out the how to become a devops engineer blog to know more.
Install Certificate Authority In Your Browser/OS
You need to install the rootCA.crt in your browser or operating system to avoid the security message that shows up in the browser when using self-signed certificates.
Installing self-signed CA certificates differs in Operating systems. For example, in MAC, you can add the certificate by double-clicking it and adding it to the keychain. Check the respective Operating system guide on installing the certificate.
Conclusion
In this article, we learned how to create a self-signed certificate with OpenSSL from scratch, view this certificate, and convert it to other formats. We hope these things help with your work.


")


")